
LuaJIT Internals(Pt. 1/3): Stepping into the VM
Welcome to the 1st part in the LuaJIT blog series.
In this one, I’ll share my take on learning about the LuaJIT interpreter. From Lexing/Parsing, to bytecode generation & exection inside the VM. This will not cover (yet) the JIT part, but rather the Lua part. I thought it’s worth documenting because even though LuaJIT is similar to Lua, it still has *some* differences in the implementation/design(for example, the entire bytecode VM is in assembly).
Also, this part is crucial in order to understand the next chapter in this series, which is the JIT engine itself.
So, without further ado, let’s begin.
Bytecode Generation
In this part, I’ll walk you through the journey that a Lua code has to pass in order to get executed. From plaintext all the way to a raw bytecode, which is then interpreted by the LuaJIT VM.
The execution of a Lua code includes(but not limited to) a call to the luaL_dostring() macro, which expands into two calls:
#define luaL_dostring(L, s) \
	(luaL_loadstring(L, s) || lua_pcall(L, 0, LUA_MULTRET, 0))
luaL_loadstringwill create aLexStateobject, which will compile the Lua syntax to bytecode.lua_pcallwill execute the bytecode itself inside the LuaJIT VM.- Then, there will be some stuff happening in the background, related to the JIT engine, but we’ll elaborate more on this at the next part of this blog series.
Lexer, Parser and friends
The first component we’ll meet in this journey is the Lexer: The lexer converts a sequence of characters (==Lua syntax) into a collection of ‘lexical tokens’. The while loop in the parse_chunk function below is doing most of the heavylifting for this task. Its wrapper/caller(lj_parse()) is the entry point for the syntax parser.
/* A chunk is a list of statements optionally separated by semicolons. */
static void parse_chunk(LexState *ls)
{
  int islast = 0;
  synlevel_begin(ls);
  while (!islast && !parse_isend(ls->tok)) {
    islast = parse_stmt(ls);
    lex_opt(ls, ';');
    lua_assert(ls->fs->framesize >= ls->fs->freereg &&
	       ls->fs->freereg >= ls->fs->nactvar);
    ls->fs->freereg = ls->fs->nactvar;  /* Free registers after each stmt. */
  }
  synlevel_end(ls);
}
Example for tokens and their type:
| Token Type | Example Value | Enum |
|---|---|---|
| literal | true, "lmao" |
TK_true, TK_string |
| identifier | var1, func2 |
N/A |
| keyword | if, return |
TK_if, TK_return |
| separator | ;, \n |
N/A |
| operator | <=, >= |
TK_le, TK_ge |
Note: The tokens defined in macro/enum in src/lj_lex.h#L14-L31
In the loop above, there’s a call to parse_stmt, this is where the action happens using a switch/case statement, which leverages the enums mentioned above:
/* Parse a statement. Returns 1 if it must be the last one in a chunk. */
static int parse_stmt(LexState *ls)
{
  BCLine line = ls->linenumber;
  switch (ls->tok) {
  case TK_if:
    parse_if(ls, line);
    break;
  case TK_while:
    parse_while(ls, line);
    break;
  case TK_do:
    /* ... */
  case TK_for:
    /* ... */
    /* ... */
  }
  return 0;
}
Essentially, using this switch/case logic above: the relevant parser is triggered and the bytecode is generated using the BCINS_*[0] and the bcemit_*[1] macros.
We’ll discuss the structure of the bytecode in more detail in the next parts. All you need to understand right now is that each and every one of those handlers(parse_if, parse_while, etc.) inside the switch/case logic will eventually generate a Lua bytecode that will be executed by the VM during the ‘execution phase’.
Note: If you’d like to see the bytecode in gdb, you can break in
lj_func_newL_emptyand examine the contents of((GCfunc*)fn)->l->pc->ptr32
To summarise, the control-flow looks as follows:
luaL_loadstring: wrapper forluaL_loadbufferluaL_loadbuffer: wrapper forluaL_loadbufferxluaL_loadbufferx: preparing aStringReaderCtxobject before callinglua_loadxlua_loadx: preparing aLexStateobject forcpparserand entering the VM usinglj_vm_cpcallstatus = lj_vm_cpcall(L, NULL, &ls, cpparser);: Telling the LuaJIT VM to triggera call tocpparsercpparser:lj_parse: Parsing the Lua code & crafting aGCProtoobject(explained below)fn = lj_func_newL_empty(L, pt, tabref(L->env));: Creating a newGCfuncwith our freshly-generated bytecode.
Bytecode Format
Lua’s bytecode format is quite straight-forward: each instruction is 32bit wide and has one of those two forms:
   +----+----+----+----+
   | B  | C  | A  | OP | Format ABC
   +----+----+----+----+
   |    D    | A  | OP | Format AD
   +--------------------
   MSB               LSB
OPis the operation/opcode (add, sub, call, etc.)- Some of the instructions has 3 operands, so each of them is 8bit-long:
A,B,C - Some of the instructions has 2 operands, so one operand(
A) is 8 bit long and the 2nd operand(D) accommodates the remaining space(16 bits long)
For the full specification, I’d suggest looking into the LuaJIT wiki.
The GCproto struct
Every Lua function has a ‘prototype object’ / GCProto, describing its characteristics. In this part, we’ll peek into how Lua function literals are represented internally in order to get a better understanding for the next topic(which aimed on bytecode execution)
Let’s take the following sample Lua script:
function foo(n)
	local mystr = 'Hello from foo'
	print(mystr)
	if n > 1337 then
		return 1
	else
		return 0
	end
end

foo(420)
We’ll start by compiling it into a bytecode dump & inspect the result:
pwn@wrld:~/src$ ./luajit -b ./tmp/test.lua tmp/output.luac
pwn@wrld:~/src$ xxd -g1 ./tmp/output.luac
00000000: 1b 4c 4a 02 02 50 00 01 04 00 02 00 0d 27 01 00  .LJ..P.......'..
00000010: 00 36 02 01 00 12 03 01 00 42 02 02 01 29 02 39  .6.......B...).9
00000020: 05 01 02 00 00 58 02 03 80 29 02 01 00 4c 02 02  .....X...)...L..
00000030: 00 58 02 02 80 29 02 00 00 4c 02 02 00 4b 00 01  .X...)...L...K..
00000040: 00 0a 70 72 69 6e 74 13 48 65 6c 6c 6f 20 66 72  ..print.Hello fr
00000050: 6f 6d 20 66 6f 6f 24 03 00 02 00 02 00 06 33 00  om foo$.......3.
00000060: 00 00 37 00 01 00 36 00 01 00 29 01 a4 01 42 00  ..7...6...)...B.
00000070: 02 01 4b 00 01 00 08 66 6f 6f 00 00              ..K....foo..
When parsing such dump, the following format is applied:
- Header:
1b 4c 4a: LuaJIT’s Magic bytes('\x1bLJ')02: LuaJIT Dump Version(BCDUMP_VERSION)02: Debug info related flags(2=BCDUMP_F_STRIP)50: size of the nextGCProtoobject
- Serialized
GCProtooffoo(n):00: flags (possible flags: src/lj_obj.h#L382-L387)01: num of params04: Fixed frame size00: Number of upvalues02(uleb128): Number of collectable constants00(uleb128): Number of lua_Number constants0d(uleb128): Number of bytecode instructions
- Bytecode instructions:
27 01 00 00 ...(total size =0x0d * 4, four byte per instruction) - Constants / Strings:
0a(uleb128): The length of the string ahead('print') plus 5. We’re adding 5 because it has a type of string /BCDUMP_KGC_STR=5). To get the length of the string, the interpreter simply subtracts 5 from 0x0aprint: Constant string no. 113(uleb128): The lenth of the string ahead('Hello from foo') plus 5(adding from the same reasons mentioned above). Which makes the actual length0xeHello from foo: Constant string no. 2
24: Size of the nextGCproto/ end of currentGCproto.
In memory, this is how it looks like:
gef➤  break lj_bcread.c:325
gef➤  hexdump byte ls->p --size 4
0x00007fffffffc3a5     27 01 00 00  |         0001    KSTR     1   0      ; "Hello from foo"
0x00007fffffffc3a9     36 02 01 00  |         0002    GGET     2   1      ; "print"
0x00007fffffffc3ad     12 03 01 00  |         0003    MOV      3   1
0x00007fffffffc3b1     42 02 02 01  |         0004    CALL     2   1   2
0x00007fffffffc3b5     29 02 39 05  |         0005    KSHORT   2 1337
0x00007fffffffc3b9     01 02 00 00  |         0006    ISGE     2   0
0x00007fffffffc3bd     58 02 03 80  |  ╔----- 0007    JMP      2 => 0011
0x00007fffffffc3c1     29 02 01 00  |  |      0008    KSHORT   2   1
0x00007fffffffc3c5     4c 02 02 00  |  |      0009    RET1     2   2
0x00007fffffffc3c9     58 02 02 80  |  | ╔--  0010    JMP      2 => 0013
0x00007fffffffc3cd     29 02 00 00  |  ╚-|--> 0011 => KSHORT   2   0
0x00007fffffffc3d1     4c 02 02 00  |    |    0012    RET1     2   2
0x00007fffffffc3d5     4b 00 01 00  |    ╚->  0013 => RET0     0   1
Just like in bytecode dump files, GCproto objects are a key part of the LuaJIT’s ecosystem and generated on-the-fly (usually) prior to creating new GCfunc objects.
  GCproto *pt;
  GCfunc *fn;
  int bc;
  bc = lj_lex_setup(L, ls); // are we parsing a bytecode dump?(1=bytecode dump, 0=Lua script)
/* ... */
  pt = bc ? lj_bcread(ls) : lj_parse(ls); // generating a prototype object
  fn = lj_func_newL_empty(L, pt, tabref(L->env)); // generating a 'callable' Lua function object
DynASM
We’re very close to talk about the bytecode execution(will be covered next), but before we get there, we’ll need to know a few things about DynASM.
DynASM is a pre-processing assembler, and used as a “Backend” for LuaJIT during the build process in order to build the buildvm binary(src/host)
The LuaJIT VM is implemented in DynASM assembler code, which makes it easier(or more precisely, less hardcore) to write the bytecode interpreter in assembly. LuaJIT leverages the abillity of DynASM’s macros, and inline C syntax in various ways, I’ll share here couple of use-cases just to help you to get a better understanding/better grip on the whole DynASM idea and how it integrates into the LuaJIT’s design/ecosystem:
Use case #1: Function arguments
If you’re familiar with the 64bit linux calling convention: you’d know that compilers place the arguments in specific registers, and if your assembly code want to access those arguments during a function call, it will have to access the appropriate register(1st arg in rdi, 2nd arg in rsi, etc.). This might make your life harder if trying to write a whole bytecode VM that supports multiple calling conventions, so instead of writing the register names explicitly, LuaJIT leverages the CARG* macro to specify arguments:
|.elif X64WIN
|.define CARG1,		rcx		// x64/WIN64 C call arguments.
|.define CARG2,		rdx
|.define CARG3,		r8
|.define CARG4,		r9
...
|.else
|.define CARG1,		rdi		// x64/POSIX C call arguments.
|.define CARG2,		rsi
|.define CARG3,		rdx
|.define CARG4,		rcx
Then, throughout the entire VM, every time you’ll want to access the 1st argument of a function you’d use CARG1 and not explicitly a specify a register name, i.e: mov rsp, CARG1. The right register will be replaced in the pre-proccessing stage of the build according to your architecture(windows, linux, 32/64bit, etc.).
Use case #2: Inline C syntax
One of the features of DynASM is that it allows you to specify a C syntax inline, the example below shows a switch/case statement right in the middle of an assembler logic:
  /* -- Comparison ops ---------------------------------------------------- */
  |.macro jmp_comp, lt, ge, le, gt, target
  ||switch (op) {
  ||case BC_ISLT:
  |   lt target
  ||break;
  ||case BC_ISGE:
  |   ge target
Use case #3: Structure/Type Support
Unlike ‘raw’ assembly, whenever you dereference a pointer, DynASM allows you to specify type information.
In the example below, you can see how the type L is assigned to a lua_State struct
|// Type definitions. Some of these are only used for documentation.
|.type L,		lua_State
Then, when trying to assign a new value for an object of type lua_State during a dereference, you can add a L: prefix to the register name(which, holds the object address) and use the -> operator just like you’d do in C struct pointers:
| mov L:RB->base, BASE
DynASM will be responsible for calculating the address of the base struct member for you.
For our purposes, that’ll be enough for a quick DynASM introduction. If you’re interested in knowing more, try reading this and peek at these docs.
Bytecode Execution Model
In this part, we’ll cover about how exactly the VM runs our generated bytecode.
The entrypoint for executing a sequence of Lua bytecode can be found in src/lj_vm.h#L11-L16. Note that the function prototypes are defined in C even though the implementation is written in assembly(src/vm_x86.dasc#L699-L851), it is designed in this way because the C code needs a way to jump into the VM(example: src/lj_api.c#L1129).
Dispatchers: what
Every Lua instruction has a ‘dispatcher’, or an instruction handler(whatever you’d prefer to call it). The dispatcher’s content is the actual implementation of the instruction. For example, if you have a MULVV instruction that multiplies two Lua variables: its dispatcher will contain a imul assembly instruction. All of the dispatchers are defined in dispatch[GG_LEN_DISP] and they are part of the Lua global state(GG_State).
This array is splitted into two parts: Static dispatchers(starting at index GG_LEN_SDISP) and Dynamic dispatchers(starting at index GG_LEN_DDISP). For now, the difference between them shouldn’t bother you too much(dynamic dispatchers will be discussed in the next part of the blog series). The important thing you should take here is: This is an array, which is full of function pointers for each bytecode implementation:
gef➤  p &((GG_State)L->glref->ptr32)->dispatch
$49 = (ASMFunction (*)[243]) 0x40000ff0

gef➤  telescope 0x40000ff0
0x00000040000ff0│+0x0000: 0x00555555576d28  →  <lj_BC_ISGE+0>
0x00000040000ff8│+0x0008: 0x00555555576d70  →  <lj_BC_ISLE+0>
0x00000040001000│+0x0010: 0x00555555576db8  →  <lj_BC_ISGT+0>
0x00000040001008│+0x0018: 0x00555555576e00  →  <lj_BC_ISEQV+0>
0x00000040001010│+0x0020: 0x00555555576e8b  →  <lj_BC_ISNEV+0>
0x00000040001018│+0x0028: 0x00555555576f19  →  <lj_BC_ISEQS+0>
0x00000040001020│+0x0030: 0x00555555576f58  →  <lj_BC_ISNES+0>
0x00000040001028│+0x0038: 0x00555555576f97  →  <lj_BC_ISEQN+0>
0x00000040001030│+0x0040: 0x00555555576fdc  →  <lj_BC_ISNEN+0>
0x00000040001038│+0x0048: 0x00555555577021  →  <lj_BC_ISEQP+0>
...
This array’s indexes are being initialized at the lj_dispatch_init() function, which is called during the startup of a new Lua state:
/* Initialize instruction dispatch table and hot counters. */
void lj_dispatch_init(GG_State *GG)
{
  uint32_t i;
  ASMFunction *disp = GG->dispatch;
  for (i = 0; i < GG_LEN_SDISP; i++)
    disp[GG_LEN_DDISP+i] = disp[i] = makeasmfunc(lj_bc_ofs[i]);
  for (i = GG_LEN_SDISP; i < GG_LEN_DDISP; i++)
    disp[i] = makeasmfunc(lj_bc_ofs[i]);
Dispatchers: how
Almost every Lua instruction handler/dispatcher is composed of two key parts that uses the following macros:
- Prologue(s) to decode instruction operands: src/vm_x86.dasc#L326-L333
- Epilogue/’footer’: src/vm_x86.dasc#L349-L365
- Decode the next opcode + jmp to the next instruction: src/vm_x86.dasc#L335-L347
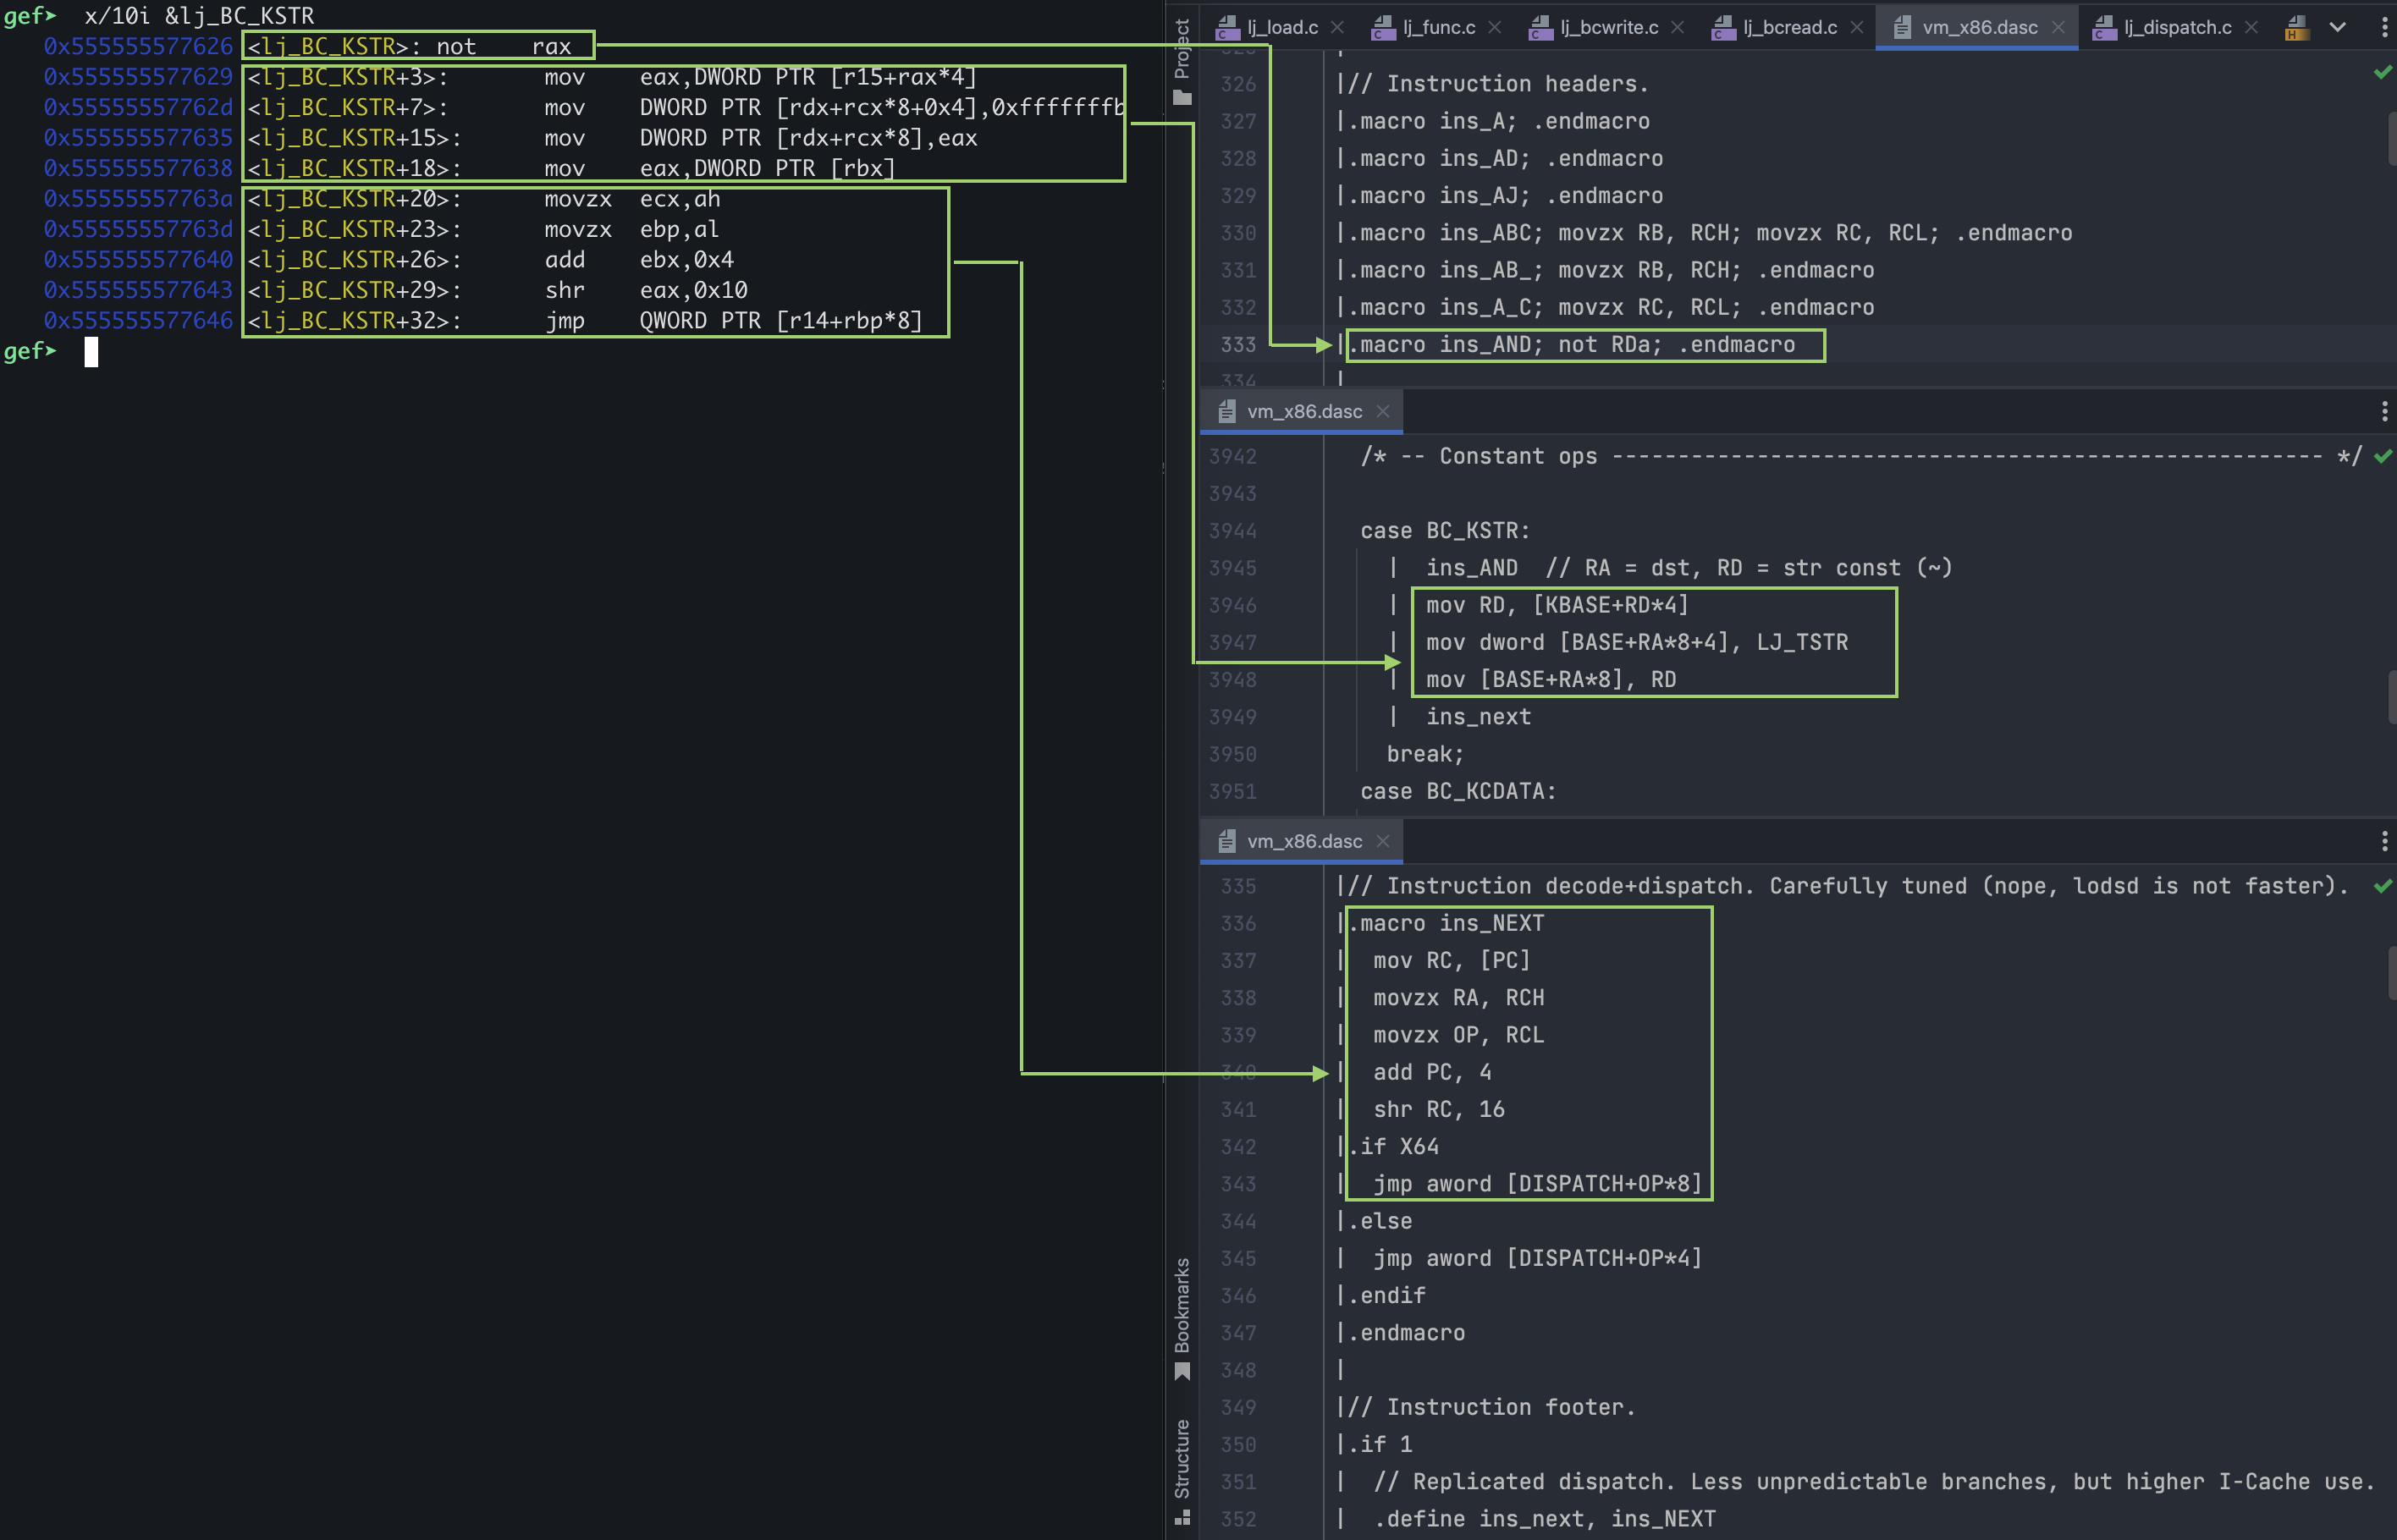
Let’s take the following example opcode KSTR:
  case BC_KSTR:
    |  ins_AND	// RA = dst, RD = str const (~)
    |  mov RD, [KBASE+RD*4]
    |  mov dword [BASE+RA*8+4], LJ_TSTR
    |  mov [BASE+RA*8], RD
    |  ins_next
    break;
In the snippet above, ins_AND is the prologue, and ins_next is the epilogue.
Click here to see the generated assembly after macro expansion
Note: The reason you’ll see in `vm_x86.dasc` function names/labels without alj_prefix(BC_KSTR/lj_BC_KSTR) is because the full symbol name is constructed inbuildvm.cwhen callingsym_insert:// src/host/buildvm.h #define LABEL_PREFIX "lj_" // src/host/buildvm.c sym_insert(ctx, (int32_t)((uint8_t *)(ctx->glob[i]) - ctx->code), LABEL_PREFIX, globnames[i]);
In summary, the ‘execution model’ inside the LuaJIT VM is as follows:

Dispatchers: why
There are couple of reasons behind this design: If we put all the bytecode handlers in one big array, it gives us the option to hot-patch the implementation very easily.
In other words, it enables us to insert stuff like hooks(debugging), profiling, recording. We’ll cover more about these in the next part of the blogpost, where we’ll dive into the Just in Time compiler.
What’s next
Congrats! Now you have a general idea about how Lua bytcode is generated and executed in LuaJIT. In the next part, we’ll get into the JIT part of LuaJIT.